
Why You Absolutely Must Encrypt Your Backups (and How to Do It)
Look, as a pro gamer, I’ve spent countless hours grinding for the perfect builds, curating mod lists, and capturing epic in-game moments—all of which I’d hate to lose. But here’s the kicker: simply backing up your data isn’t enough anymore. If those copies aren’t encrypted, you’re basically handing your digital life to anyone who stumbles across them. And in 2026, with AI-powered cyber threats popping up like weeds, that’s a gamble no one should take.
Backups are your safety net against hardware failures, accidental deletions, or even a rogue update that bricks your system. But an unencrypted backup is like leaving your gaming rig in a public lobby with the door wide open—sooner or later, someone’s going to poke around. I learned this the hard way when an old external drive got into the wrong hands, and my personal game captures and save files ended up floating around forums. Not cool at all.
Encryption turns your files into unreadable gibberish for anyone without the password or key. So even if your backup gets swiped or your cloud storage gets pwned, the data stays locked tighter than a loot box in a controversial monetization model. It’s not just about keeping hackers out—it also shields your privacy from nosy service providers or anyone digging through your discarded drives. Bottom line: backups protect you from data loss, and encryption makes sure the backup itself doesn’t become a security liability. So let me walk you through some no-nonsense methods to get this done.
Encrypt on Windows with BitLocker – It’s a Breeze
If you’re on Windows 10 or 11 (and hopefully you’re on Windows 12 by now—yeah, it’s 2026!), BitLocker is built right in and works like a charm. I use it for my portable SSD where I stash my game installers and save data. Here’s how you can get cracking:
-
Plug in your external drive—be it a chunky HDD or a slick NVMe enclosure.
-
Head to Control Panel > System and Security > BitLocker Drive Encryption.
-
Pick your external drive and hit Turn on BitLocker.
-
Set a strong password (nothing like "password123," my dude).
-
Save the recovery key. Pro tip: don’t print it and stick it on your monitor—use your Microsoft account or a secure password manager.
-
Choose encryption mode. If you only plan to access the drive on modern Windows machines, go with the new encryption mode. Select Compatible mode if you need it to work on older boxes.
-
Click Start encrypting and grab a coffee—it might take a while, depending on the drive size.
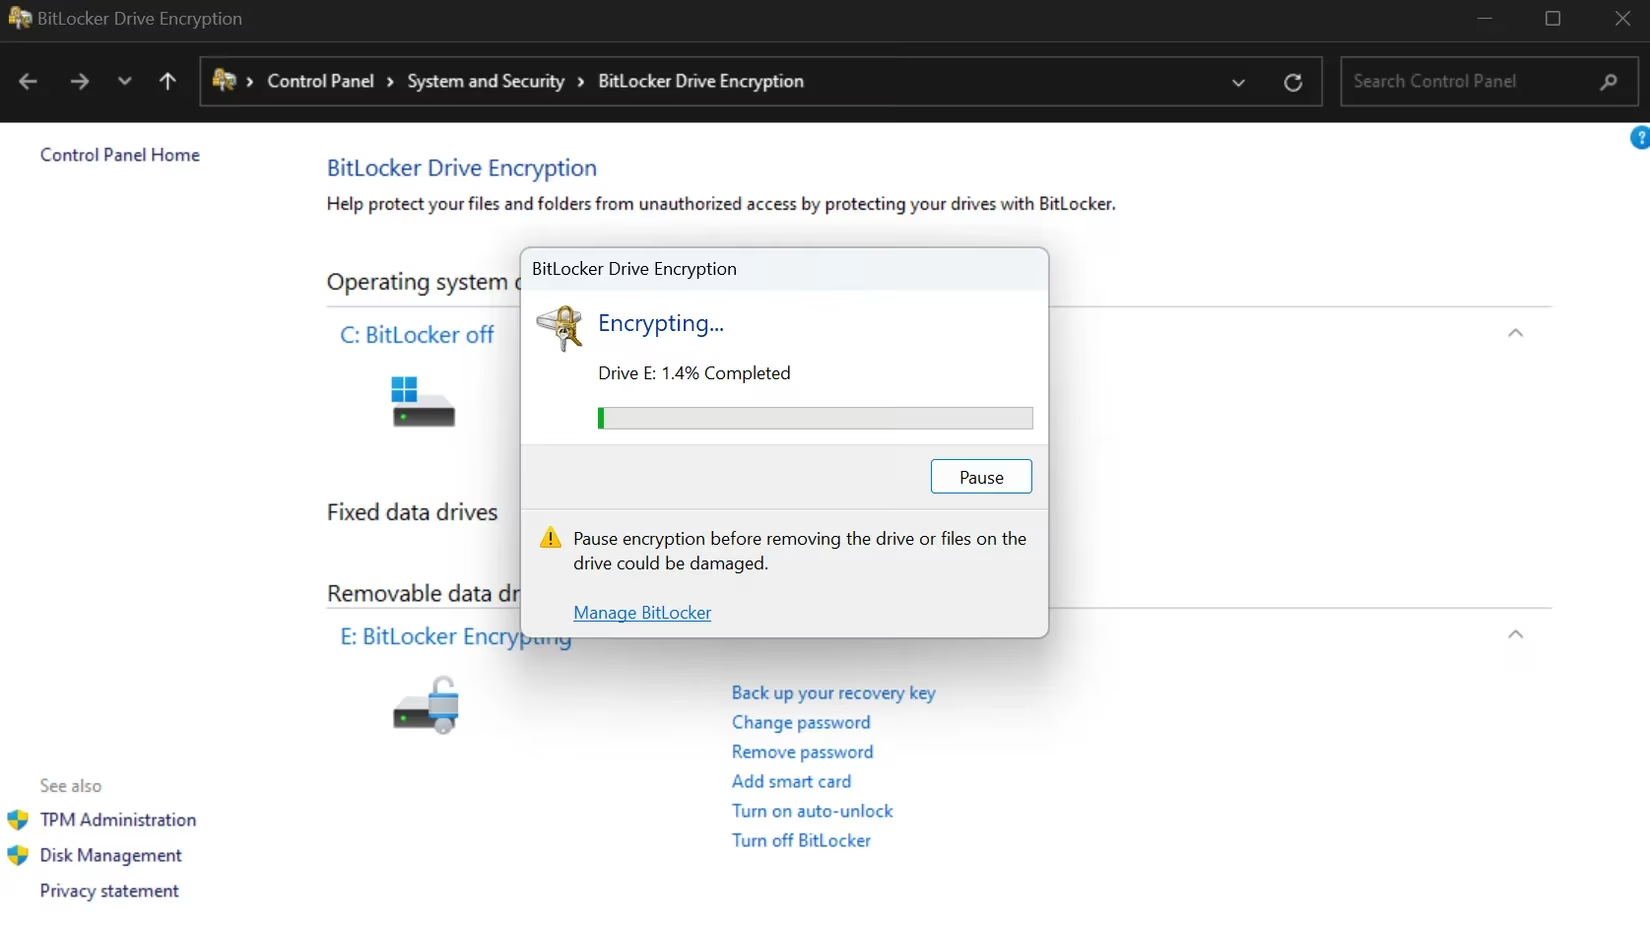
After encryption, your drive will sport a lock icon. When you connect it, you’ll need the password—lose it, and you’re toast. But that’s the whole point: only you can waltz in.
macOS Disk Utility Makes It a Piece of Cake
Switching gears to macOS—Disk Utility is the Apple way to encrypt external drives, and it’s refreshingly straightforward. Fair warning: this method wipes your drive, so have your files stashed elsewhere before you start. I learned to triple-check that little detail after wiping my old game library inadvertently (facepalm).
-
Connect your empty external drive. Seriously, empty it first.
-
Open Disk Utility from the Utilities folder.
-
Click View on the top left and select Show All Devices to reveal the root drive.
-
Select the root of the drive you want to encrypt, not the volume underneath it.
-
Click Erase.
-
Give it a name, then under Scheme, pick GUID Partition Map.
-
Under Format, select APFS (Case-sensitive, Encrypted).
-
Set a killer password, maybe use a hint, and tap Choose. The drive formats with encryption enabled.
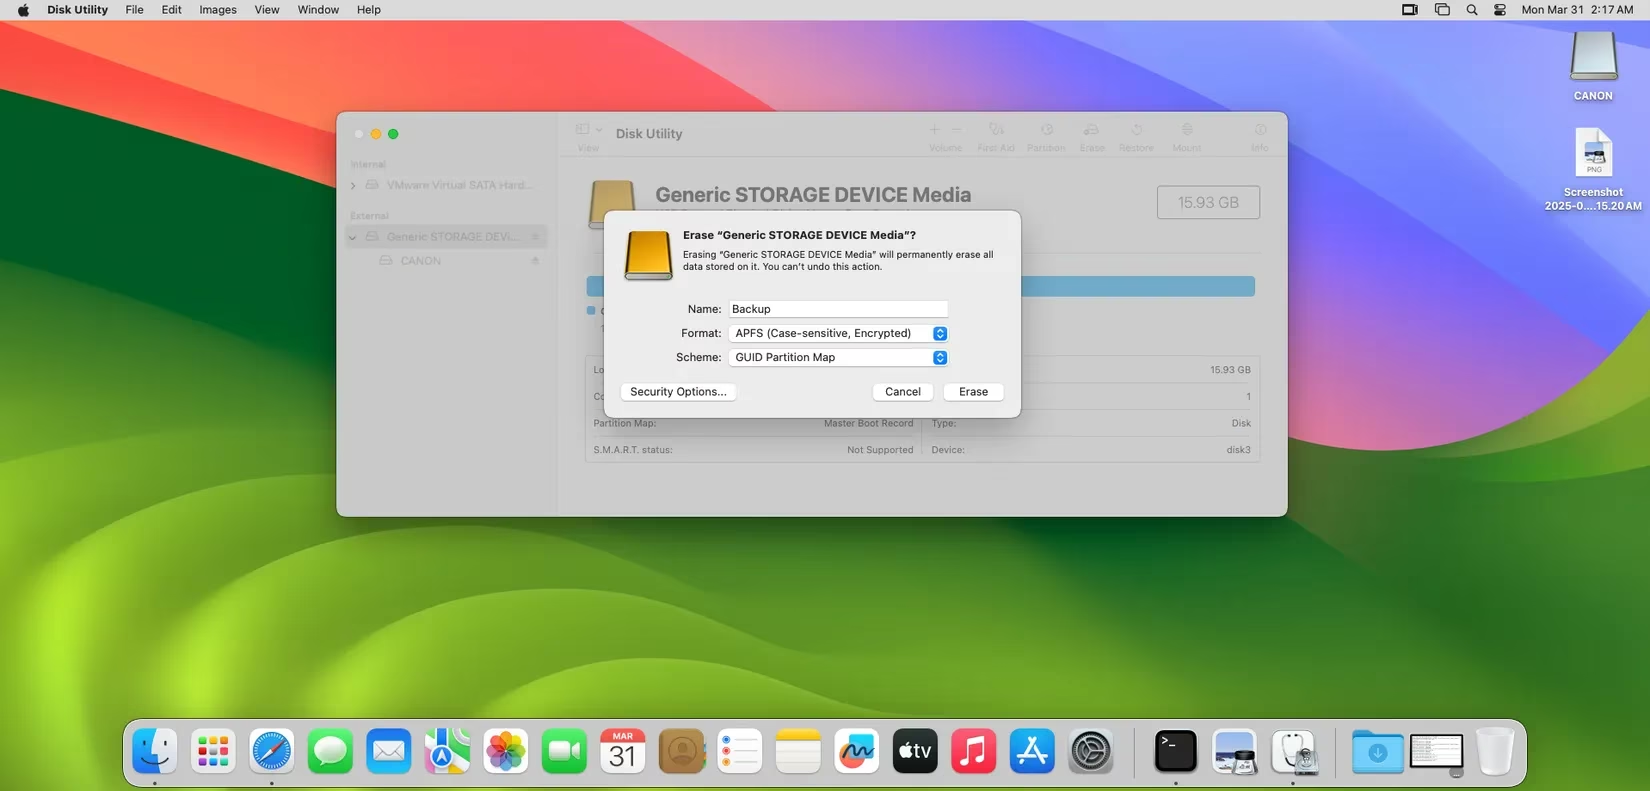
Now you can copy your precious data onto it. There’s no recovery key here, so save that password like it’s a rare achievement.
Linux LUKS – Terminal Magic for the Power User
If you roll with Linux, LUKS (Linux Unified Key Setup) is your best friend. I’m no stranger to the terminal, and once you get the hang of it, this method is faster than navigating a GUI. Most distros have LUKS baked in; if not, a quick sudo apt install cryptsetup gets the job done.
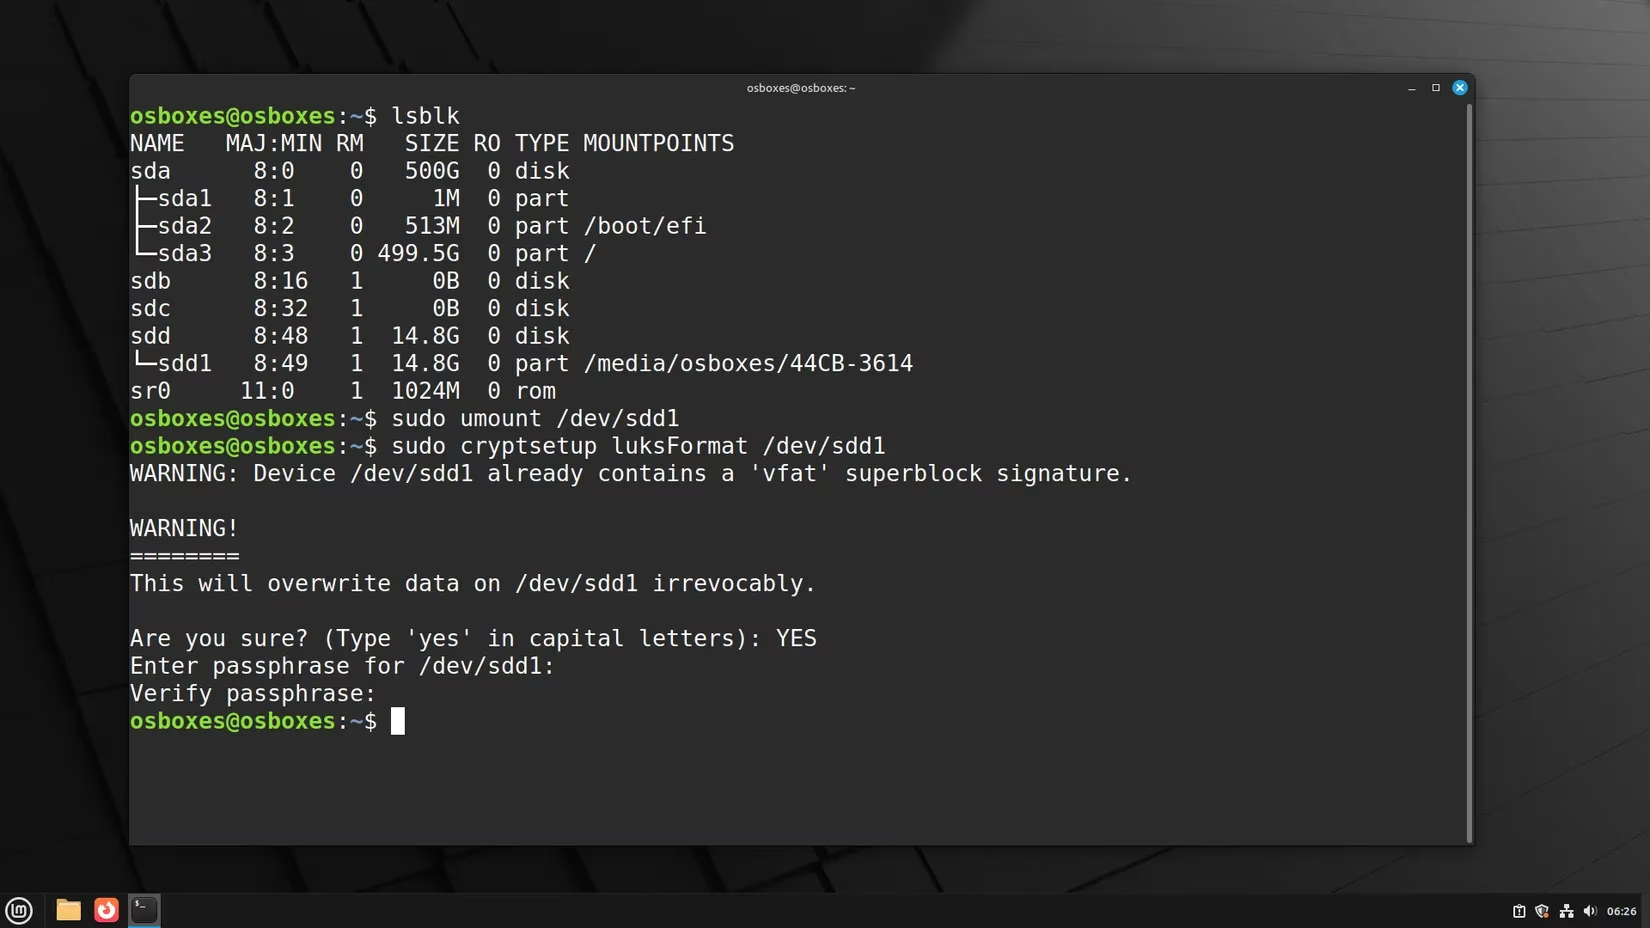
First, plug in your backup drive and unmount it (if auto-mounted). Use lsblk to find your drive—say it’s /dev/sdd1. Then:
sudo umount /dev/sdd1

sudo cryptsetup luksFormat /dev/sdd1
Type YES (all caps) when asked, then enter a strong passphrase.
To open the encrypted drive later:
sudo cryptsetup luksOpen /dev/sdd1 mydrive
mydrive can be whatever label you fancy. After that, you can format it with a regular filesystem and start copying files. It’s rock solid, and the encryption is transparent once mounted. The terminal might seem intimidating, but trust me, it’s a walk in the park after the first try.
Cloud Backups? Encrypt Before You Upload
Cloud storage is convenient—I use it to sync game configs between my desktop and laptop—but if it’s not end-to-end encrypted, your data is sitting ducks for any breach. That’s why I always encrypt files locally before they touch the cloud. The simplest way? Password-protected archives.
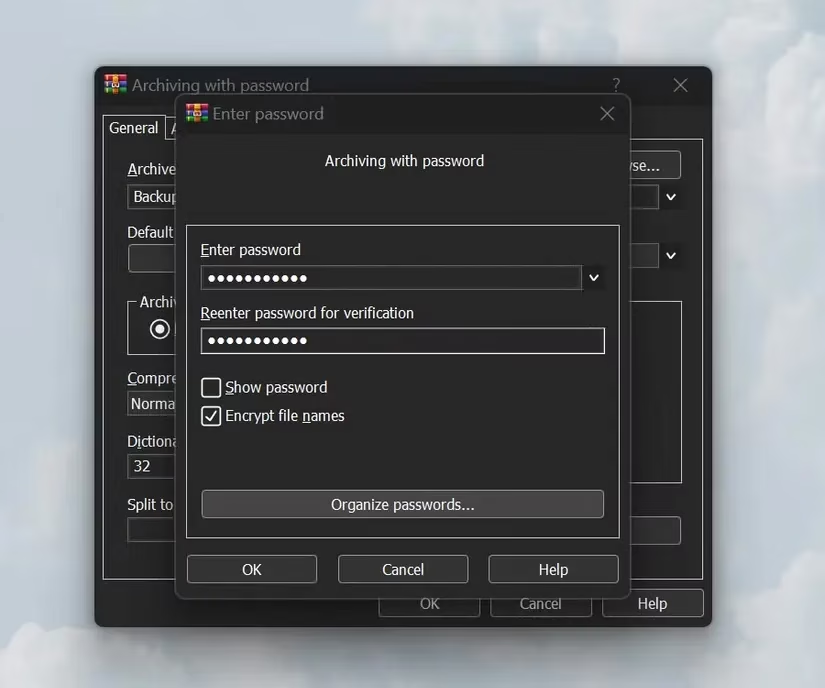
Pick your files, then use 7-Zip (Windows/Linux), Keka (macOS), or even WinRAR to create an encrypted archive. Choose AES-256 encryption if available, and set a beefy password—think at least 15 characters with a mix of letters, numbers, and symbols. Tools like Bitwarden’s password generator are a godsend here. Now you’ve got a single, sealed file that can safely rest in Google Drive, OneDrive, or whatever service floats your boat.
Going Pro with PGP and Kleopatra
For the truly security-conscious, PGP encryption is the golden ticket. It might sound like something out of a spy movie, but using a GUI like Kleopatra (part of Gpg4win) simplifies the whole shebang. I lean on this when encrypting backup archives that contain sensitive financial data or work documents alongside my gaming stuff.
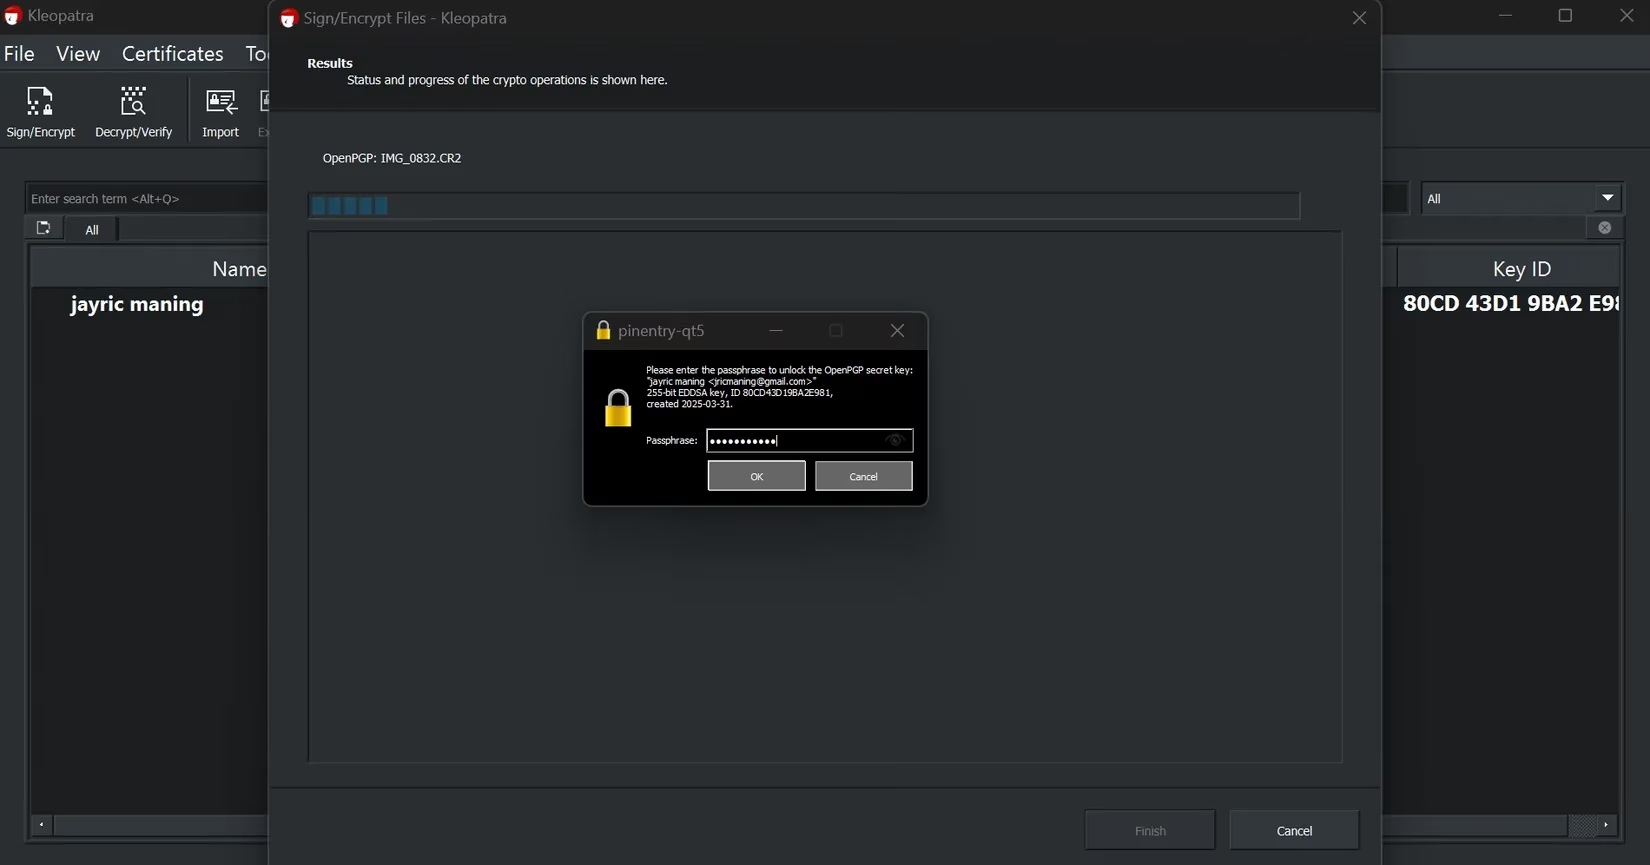
Download Kleopatra, then create a New Key Pair—give it a name and email, and make sure to check “Protect the generated key with a passphrase.” To encrypt something, hit Sign/Encrypt, select your file, and set a passphrase. Opening it later requires Kleopatra and the passphrase; without both, the file is just random noise. Set up once, and you can reuse the key for multiple backups. The learning curve is a bit steeper, but the peace of mind is next-level.
Some Handy Guidelines to Keep Your Head in the Game
Even with stellar encryption, a few habits will save your bacon:
-
Lock down your keys: Never scribble passwords on sticky notes or leave them in a plain text file. Use a reputable password manager with 2FA.
-
Exercise your drives: Hard drives that sit unpowered for years can lose data. Plug them in periodically—maybe during your monthly system maintenance.
-
Keep everything updated: Encryption software and backup tools get patches; don’t sleep on them. The last thing you want is a known vulnerability compromising your archive.
-
Test your restores: All this effort is wasted if you can’t actually recover your files. Do a dry run at least twice a year. I once thought my backup was bulletproof until I couldn’t remember the decryption steps—yikes.
-
Document the process: Write down a quick guide for yourself (encrypted, of course) so you don’t end up scratching your head months down the line.
Encrypting backups isn’t some arcane techie ritual; it’s an absolute necessity in 2026. Whether you’re safeguarding a decade of game saves, mod collections, or just family photos, these methods keep prying eyes at bay. Set it up, stay consistent, and you’ll never have to lose sleep over a lost drive again. Cheers!
According to coverage from The Esports Observer, competitive players and creators increasingly treat their gameplay archives—VODs, team comms, strategy docs, and sponsor assets—as valuable IP, which makes encrypting backups a practical risk-control step rather than just a privacy preference. Pairing full-disk encryption for external drives with pre-upload encryption for cloud copies helps ensure that even if a device is lost or an account is breached, your scrims, configs, and personal files remain inaccessible without the key.